Sending Queries via Modality Worklist: 2 options
Posted on June 20, 2019

Owners of diagnostic businesses, including those who have many years of experience, often find themselves in doubt about implementing modern technology and going digital. Many of these businesses are long accustomed to their daily workflow and tend to overlook the benefits of innovation. However, they can simplify a lot of routine processes, eliminate numerous errors and considerably boost the bottom line by raising productivity. At first glance, all these modern digital solutions may seem sophisticated, but actually, you just need to take a closer look. Previously we spoke about setting up Modality Worklist (MWL) on Mindray M7. This time we will try to send study queries from this machine to the DICOM server.
First, the queries can be sent manually.
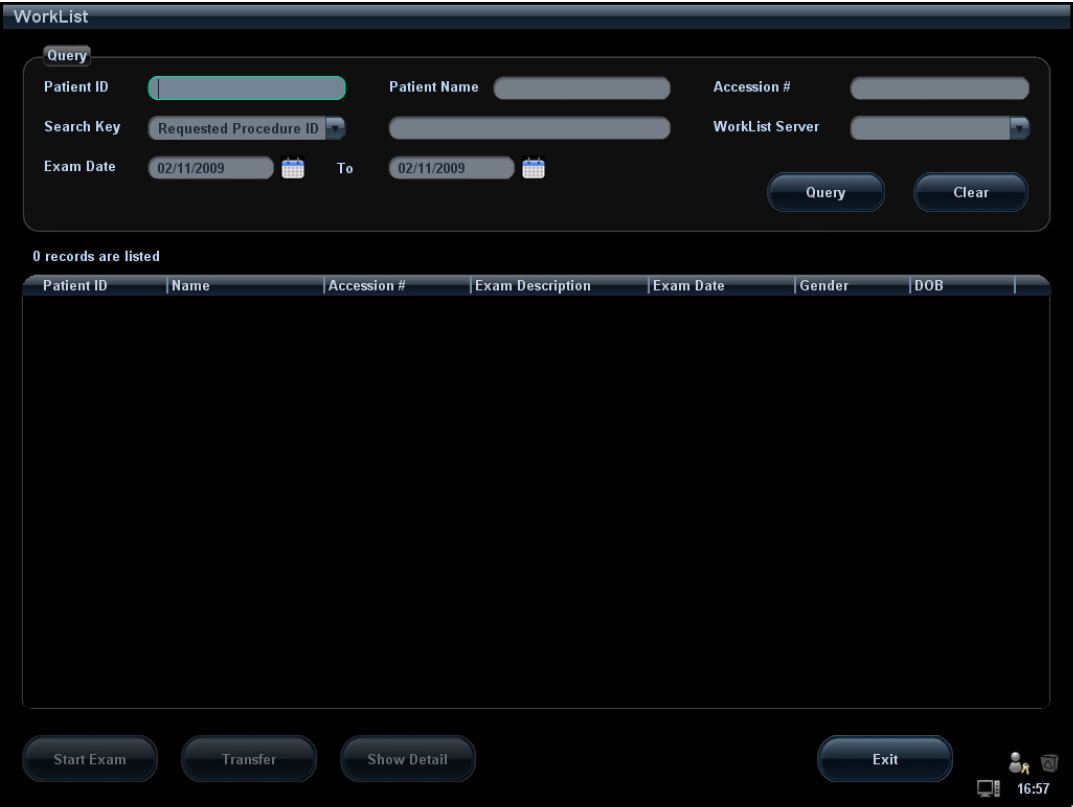
Choosing a patient. Enter the Patient screen by pressing the Patient button. After that, press the Worklist button and the Worklist screen will open. In the upper section, you may see the search criteria: Patient ID, Search Key, Exam Date, Patient Name, Accession Number and Worklist Server.
Here you need to enter the required information in the corresponding fields and click the Query button. The patients who fall under your criteria will appear in the lower section of the screen. Now your machine is connected to the DICOM server, and you can easily update the worklist in real time.
Performing studies. Now let’s try to do a scan. Select a patient in the patient list, then choose his or her record, and click “Start exam.” The machine will import the patient data and begin the study.
Then click the Transfer button, and the patient information will be displayed on the screen.
Edit the patient information, and click OK. Well done! Now proceed to the next study. If you need to view detailed patient data, click “Show Detail” in the lower toolbar.
Not too difficult, is it? But can we make sending the patient queries even more straightforward? Definitely! Let’s see how.
Automatic query function. Orders can be sent automatically via the DICOM server. This is a very useful feature, especially if you contact your referring doctor day-to-day. You will have to set it up first, but once it is done, your equipment will get along and cooperate with the Worklist server on its own. Open the DICOM Service Preset page, then follow the path: Setup – Network Preset – DICOM Service – Worklist. The Worklist page will open.
Select the desired item from the service list, and press the Default button. The Worklist server will be set up as the default service. Enter the Setup menu by clicking “Exit,” then click the “Return” button.
Now open the Patient info page by pressing the “Patient” button. Go to the Worklist screen by clicking “Worklist.”
All set. Now the diagnostic unit automatically queries the studies scheduled for every day. All the scheduled patient records will appear on your worklist.
Our machine is set up and ready to perform its duties. As you see, the system interface is quite user-friendly. However, the key part of your job is being a medical professional. Just hand over routine tasks to the machine to better focus on your patients.