EMSOW Weekly Newsletter – April 16, 2020
Posted on April 16, 2020
[#19955] Group exams by accession number in EOM report
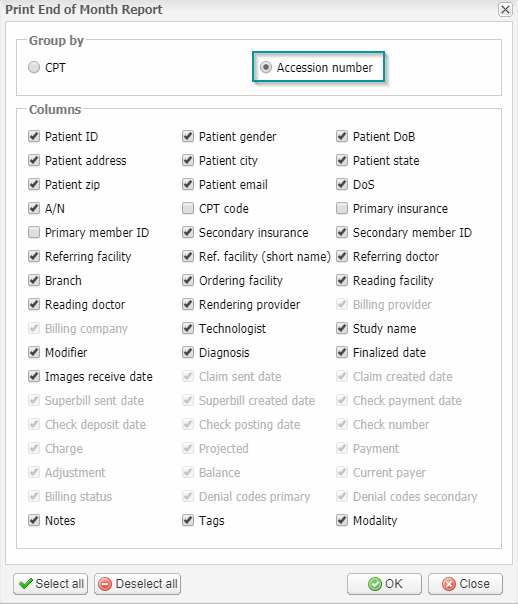
We have extended the functionality of the End of month report (EOM). Now you can group studies by accession number. Open the Billing module, click Report, then select End of month (EOM) report in the dropdown menu. Select Accession number in the Group by section of the window that opens, select the columns you want to include, then click OK.
[#19951] Copy addresses from referring facilities of any type
In the previous versions of EMSOW, you could copy a service address from nursing homes only. We have improved this option, and now you can copy the address from referring facilities of any type.
[#19630] “Check payer” search filter in the Billing module
We have added the Check Payer search filter to the Billing module. It is located in the Payments section of the search panel. Type the payer’s name in the field or select it from the dropdown menu, then click Search.
[#18935] Support for DICOM transfer syntax 1.2.840.10008.1.2.4.102
We added support for DICOM transfer syntax 1.2.840.10008.1.2.4.102 “MPEG-4 AVC/H.264 High Profile / Level 4.1” to play cineloops in MPEG-4 format in our image viewer.
[#19961] Service ID column in RVL
We have added a new column to the Resident Visit List (RVL), “SID”. The new column shows the service ID for each record. To download the RVL, go to the Processing module, click on the Print button in the order pane, then select Resident Visit List in the dropdown menu.
[#19604] Sort RVL by Type of Visit
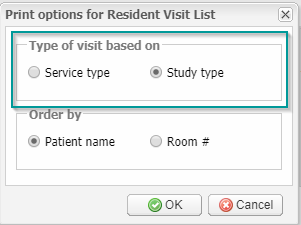
The new version of EMSOW allows you to sort the RVL by the type of visit. Click Print in the order pane of the Processing module, then select Resident Visit List. In the window that opens, select Service type or Study type. The RVL will list new studies first, and then it will list follow-up studies.
[#19623] Create tentative orders
From now on, referring physicians can order studies from service providers without specifying an exact date of service. This can be very helpful when the date on which a study should be performed is to be determined at some point later.
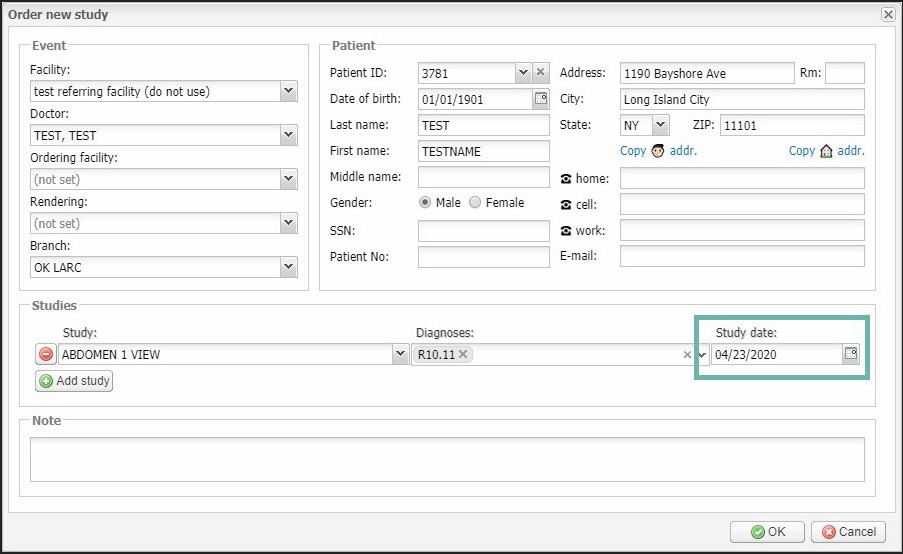
To order a study, open the Physician Portal and click the Order studies button on the toolbar. The Ordered studies window will open. In this window, you can add new and manage your existing ordered studies. For a new study, simply click the Add new button on the toolbar:
Here, you can enter necessary patient information, select the type of study, and choose a tentative study date or leave this field blank. Click OK to create a study.
After that, the created study goes to the Dispatch module for further scheduling and dispatching. To manage the ordered studies from the Dispatch module, click the Order studies button on the toolbar. The Ordered studies window will display the Schedule button on the toolbar:
This button turns a tentative study into a confirmed one that dispatch can assign to a technologist.


