New App Manual
Contents:
1. Preparing for the demo
2. Log In and Application settings
3. Working in the app
4. Geolocation module
1. Preparing for the demo
To prepare for the demo, enter the Processing module. Log on to your EMSOW account and click Processing on the upper navigation bar.

For the demonstration, you will need to create three orders. To create an order, click the Create ![]() button on the left sidebar. In the opened window enter the required order information.
button on the left sidebar. In the opened window enter the required order information.
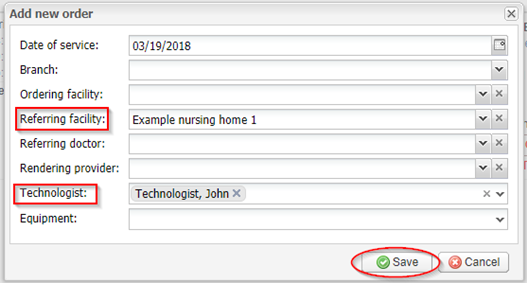
Please note, that you need to carefully follow the specific settings for each order:
For the First order: enter ‘Example nursing home 1’ in the Referring facility field and ‘Technologist, John’ in the Technologist field.
For the Second order: enter ‘Example referring facility 1’ in the Referring facility field and ‘Technologist, John’ in the Technologist field.
For the Third order: enter ‘Example nursing home 2’ in the Referring facility field and ‘Rendering, Julia’ in the Rendering provider field. The created orders will be displayed in the left sidebar as ‘Example nursing home 1’, ‘Example referring facility 1’ and ‘Example nursing home 2’.
Start typing in the corresponding field or use the Arrow ![]() button to open the drop-down menu. Select the required options and click the Save button.
button to open the drop-down menu. Select the required options and click the Save button.
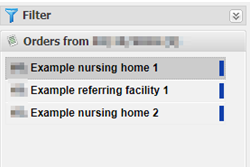
If you need to edit order information, click Edit order ![]() button on the top toolbar.
button on the top toolbar.
After creating the orders, add the services: TEST, PATIENT ONE for the First order, TEST, PATIENT TWO for the Second order and TEST, PATIENT THREE for the Third order.
To create a new service, click the Add ![]() button. The Add new service window will open.
button. The Add new service window will open.
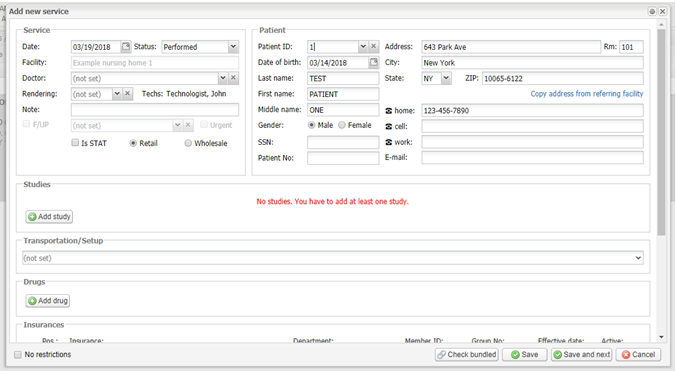
You do not need to enter the complete patient information manually. Enter ‘03/14/2018’ in the Date of birth field or start entering the patient name in the Last name or First name fields and the list of available patients will open.
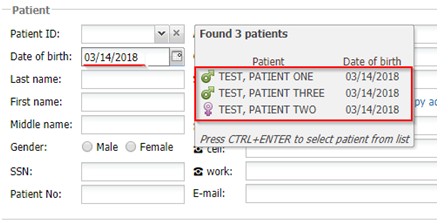
Press Ctrl+Enter, then select the needed patient. The patient demographic and insurance information will be filled out automatically.
To add a study, click the Add study ![]() button in the Studies section. Start entering the name of the Study or use the Arrow
button in the Studies section. Start entering the name of the Study or use the Arrow ![]() button to open the drop-down menu.
button to open the drop-down menu.
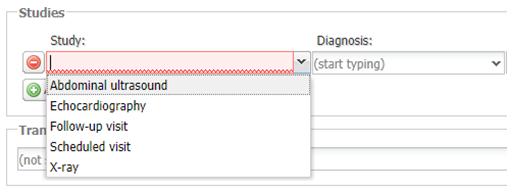
Select type of study and click the Save ![]() button.
button.
Please note, that for each demonstration you need to create new orders and services, services should not be moved from / to other orders.
Logins for the demo purposes:
Each Technician account will see the same information on their screens. You can use this for demonstration purposes, so the client can log in into the account on their own device.
demotech1
UN8Ct6Zh
demotech2
fmLd85Pw
Each Rendering provider will see the same information on their screens. You can use this for demonstration purposes, so the client can log in into the account on their own device.
demorend1
UN8Ct6Zh
demorend2
6H9YrjEW
2. Log In and Application settings
First Log In
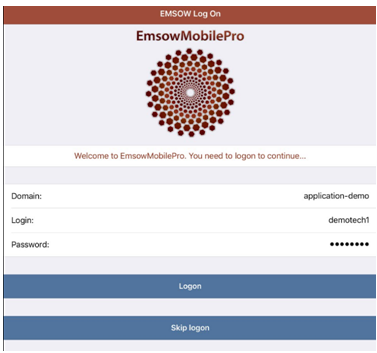
When you first launch EmsowMobilePro app you will be asked to log in. On the Log On screen enter the domain name (only first part, without .emsow.com), login and password in the corresponding fields and tap Logon.
Application menu:
Tap ![]() menu button in the upper-left corner of the screen. The applicationmenu will open. It consist the following options:
menu button in the upper-left corner of the screen. The applicationmenu will open. It consist the following options:
1) Facility list
To enter the list of facilities scheduled for the day, tap Facility list in the pop-up menu.

2) Settings

If you need to change account you are going to setup, enter another domain name, login and password in the corresponding fieldsof the CONNECTION SETTINGS section.
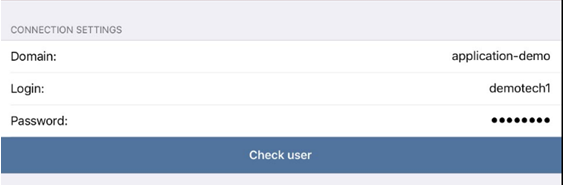
You can also check the availability of the account by tapping Check user. After tapping Check user, the message at the top of the screen will inform you about availability of the chosen domain and data.
You can setup intervals for studies and events by using ENTRY INTERVAL SETTINGS section.
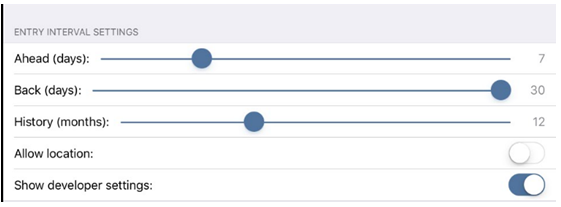
Use the Ahead (days) slider to set up the period for which the planned events need to be displayed in the Facility List. The Ahead period can be set up to 30 days.
Use the Back (days) slider to set up the period for which the previous events need to be displayed in the Facility List. The Ahead period can be set up to 30 days. The Back period can be set up to 30 days. For example, when you enter 10, the events for the last 10 days will be displayed in the Facility list.
Use the History (months) slider for adjusting period for which the previous studies for the patient shownin the History tab of study managment. The History can be set up to 32 months.
The Allow Location feature allows EMSOW to track your mobile device with EmsowMobilePro. Toggle the Allow location switch to enable or disable this feature.
3) Write to Support
If you have any questions or problems with EmsowMobilePro, you can contact our Technical Support. Tap Write to support in the pop-up menu.

The built-in message system will open.
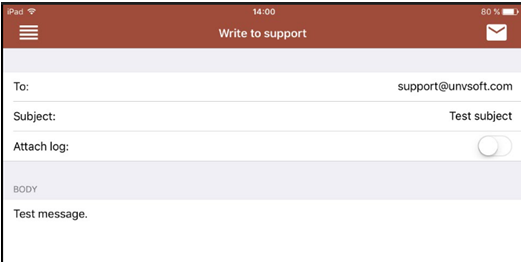
In the opened screen fill out the Subject field. Normally the e-mail address of the Technical support is entered by default. If you need to attach log, use the Attach Log toggle switch. Write your message in the BODY field. Please mind that all the fields are obligatory and cannot be blank. After having written your message, enter the mailing service of your mobile device by tapping the ‘Envelope’ icon in the upper-right corner ![]()
4) Change user
If you need to enter another account, tap Change user in the pop-up menu. In the opened The Log on screen enter another domain name, login and password.

5) About
Tap About in the pop-up menu to displaythe information about the application.

On the information screen you can view information about EmsowMobilePro, EMSOW corporation or enter the official website.
6) Exit
To exit the application, tap Exit in the pop-up menu.

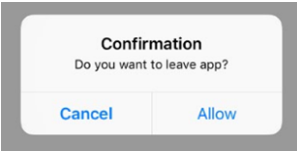
The exit screen will appear. Tap Allow to exit or Cancel to return to the application in the Confirmation window.
3. Working in the app
Visit list
Before you start working with the Visit list for the day, it is recommended to refresh it by tapping the Refresh ![]() icon. The Visit list and RVL will be refreshed with latest information about scheduled visits.
icon. The Visit list and RVL will be refreshed with latest information about scheduled visits.

The numbers to the right of each facility indicate the number of studies that have not been sent.
To start working with patient lists, tap the corresponding facility. The RVL (Resident Visit List) will open.

If the room numbers are entered, the patients will be grouped by room number, otherwise they will be listed alphabetically.
Adding a new patient record
To add a new patient, tap Plus ![]() at the top of the screen. In the opened Test Information screen, you will see four tabs: Demographics, Address, Contacts and Insurances.
at the top of the screen. In the opened Test Information screen, you will see four tabs: Demographics, Address, Contacts and Insurances.
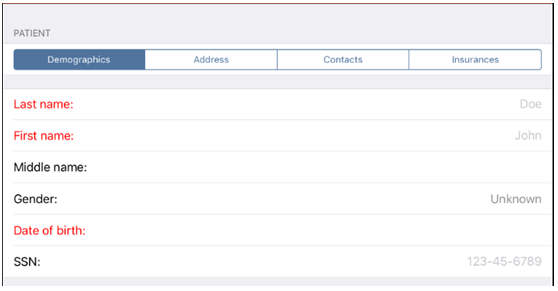
Enter the patient’s Last name, First name, Middle name, Gender, Date of birth and SSN in the corresponding fields of the Demographics tab.
In the Address tab, enter the patient’s room, address, city, state and ZIP code.
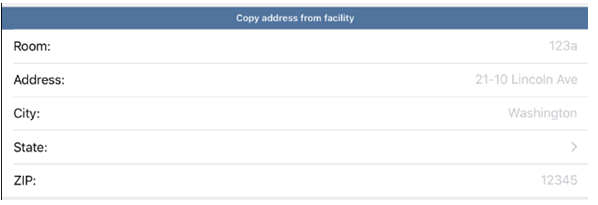
You can also copy address from the facility if patient is in the nursing home by tapping the corresponding button. In the Contacts tab you can enter cell, home or work telephone numbers and the email of the patient.
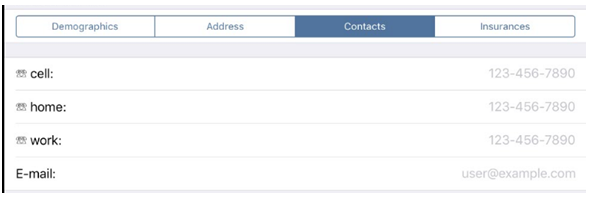
To enter, edit, delete or check the patient’s insurance information, tap the Insurances tab.
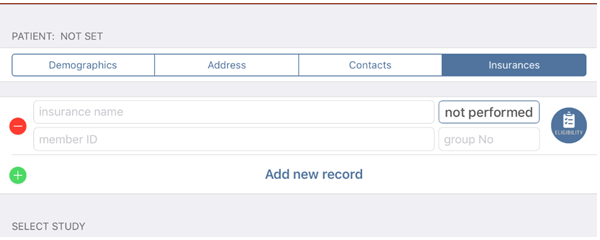
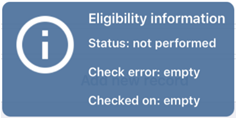
To create a new insurance record, tap ‘Add new record’. Enter insurance name, member ID and group Number (if applicable) into the corresponding fields. To check insurance eligibility, tap the Eligibility  icon. To the right of the Eligibility icon you can view eligibility check status. For example, the eligibility check status in the picture above is ‘not performed’, which means that insurance eligibility has not been checked. For detailed information on insurance eligibility, tap the status button. The Eligibility information will be displayed.
To enter a study, tap Study in the SELECT STUDY section.

The list of available studies will open.
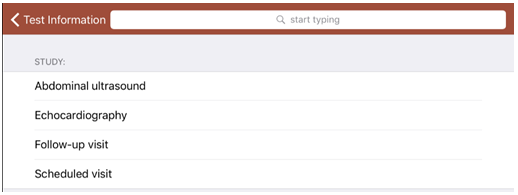
Choose the needed type of study by tapping it in the list or entering in the field at the top of the screen.
To save the patient information, tap the Save ![]() icon in the upper-right corner of the screen.
icon in the upper-right corner of the screen.
Editing and deleting patient records
To edit or delete patient records, tap the Patient field and hold it for two seconds, then slide it to the left. Tap Edit to enter the Test information screen or Delete to delete the patient record. To return, tap the Patient field. Edit screen for already existing study is similar to the previously described in ‘adding a patient record’ part of the manual screen.
![]()
To manage the patient records, tap the Patient field and the Study management screen with common information will open.
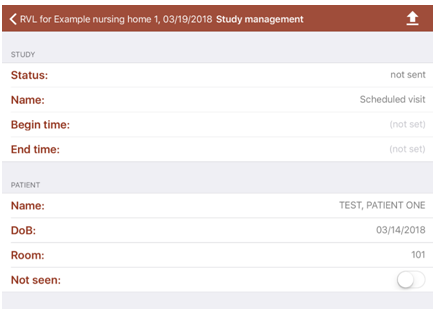
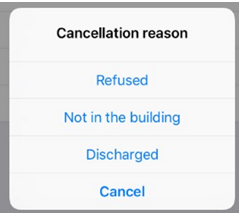
It is divided into two sections: STUDY and PATIENT. In the STUDY section you can check Status, Name, Begin and End time of the study. In the PATIENT section, you can check the patient’s name, date of birth (DoB) and Room number. You can also indicate the cancellation reason if the patient has not been seen by the doctor. Toggle the Not seen switch and select the Cancellation reason: Refused, Not in the building or Discharged. To return to the Study management screen, tap Cancel.
To manage the Patient’s documents, tap the Documents  icon at the bottom of the screen. The Document management screen will open.
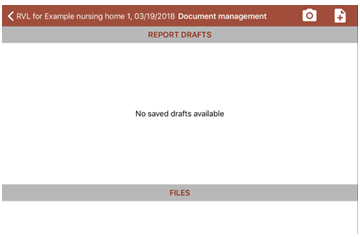
As you can see, it is divided into two sections: REPOR DRAFTS (for Rendering providers) and FILES (for Rendering providers and Technicians).
To add a new draft report, tap the Add  icon in the upper-right corner of the screen. The Report management screen will open.
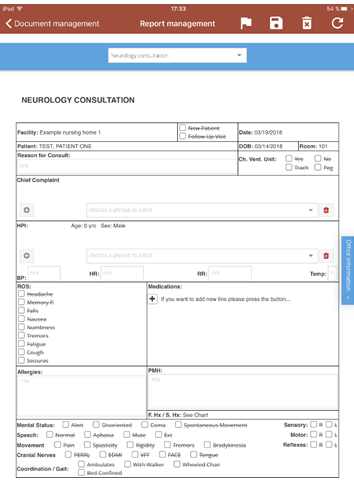
Here you can choose the template type by tapping the Template type field at the top of the screen.

Select the appropriate template in the opened menu.
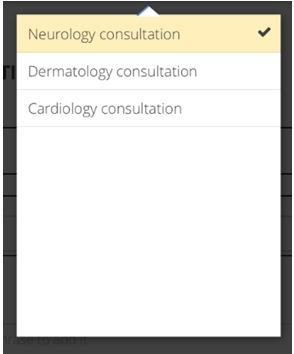
To return to the report, tap anywhere outside the template list menu. Fill in the template form, then tap the Save icon to save the record or the Bin  icon to clear the record. If you need to refresh the results, tap the Refresh
 ![]() icon (please note: if you tap the refresh icon, the unsaved information will be lost).
icon (please note: if you tap the refresh icon, the unsaved information will be lost).
To schedule a follow-up visit, a test or enter studies and diagnoses, tap the Office information tab on the left.
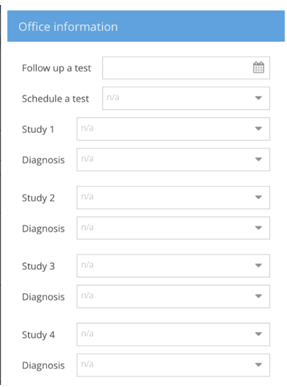
To edit draft report, tap the field of the corresponding draft. To delete draft report, tap the field of the corresponding draft, hold it for two seconds, then slide left.

Tap Delete to delete the selected draft. To cancel, tap the Draft field once more.
To upload files, tap the Add file ![]() icon in the upper-right corner. Select the file type or tap Cancel.
icon in the upper-right corner. Select the file type or tap Cancel.
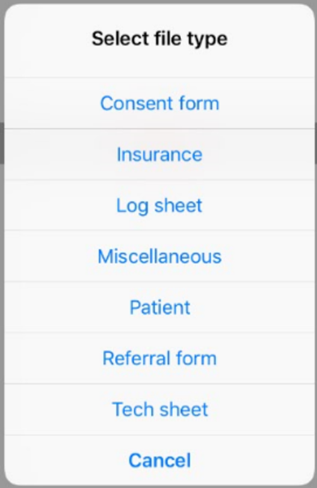
After selecting the file type, choose the file from the albums in your mobile device or tap Cancel in the upper-right corner.
To view the patient study history, tap the History ![]() icon.
icon.
Sending studies
To send the studies to the domain, tap the Send ![]() icon in the upper-right corner of the screen. When all the required information is entered, all the listed studies will be sent jointly.
icon in the upper-right corner of the screen. When all the required information is entered, all the listed studies will be sent jointly.
Printing the results
To print the results, tap the Print ![]() icon in the upper-right corner. Please note, that this feature is available only when the Draft reports are filled in. If the study has only document files, the information cannot be printed.
icon in the upper-right corner. Please note, that this feature is available only when the Draft reports are filled in. If the study has only document files, the information cannot be printed.
4. Geolocation module
Geolocation Tracking
For tracking technicians and spotting facilities, use Geolocation Tracking module. Log on to your EMSOW account, click Accounting on the upper navigation bar, then select Geolocation Tracking in the drop-down menu.

Use the Options sidebar to track users and facilities. In the Date field you can edit the tracking date (the current date is set by default).
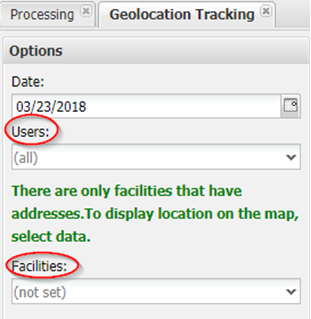
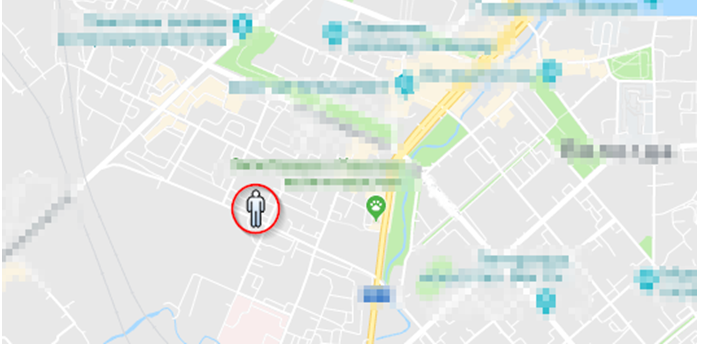
The Users field is needed to track technologists. All technologists are displayed on the map by default. If you need to track one or several particular technologists, start entering the user name in the Users field or use the Arrow ![]() button to open the drop-down menu. Select the needed user / users, then click the Search
button to open the drop-down menu. Select the needed user / users, then click the Search ![]() button. The technologists will be displayed on the map.
button. The technologists will be displayed on the map.
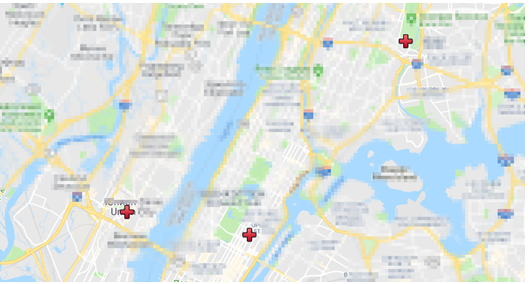
The Facilities field is used to spot the facilities. Unlike the users, the facilities are not displayed by default. If you need to find some particular facilities, start entering the name of the facility in the Facilities field or use the Arrow button to open the drop-down menu. Select the needed facility / facilities, then click the Search button. The facilities will be displayed on the map.
Click the Clear ![]() button to clear the search results. To refresh the page, click the Reload
button to clear the search results. To refresh the page, click the Reload ![]() button.
button.
