The Users module allows system administrators to manage user accounts. In this module you can add new users to the system, remove them, and edit particular information about them. To open the module, sign into your account on your EMSOW site, click ADMIN in the upper navigation bar and click USERS in the drop-down menu.
On the top toolbar such buttons as Add new, Edit selected, Remove selected, Merge selected, Copy to clipboard and Export are available:
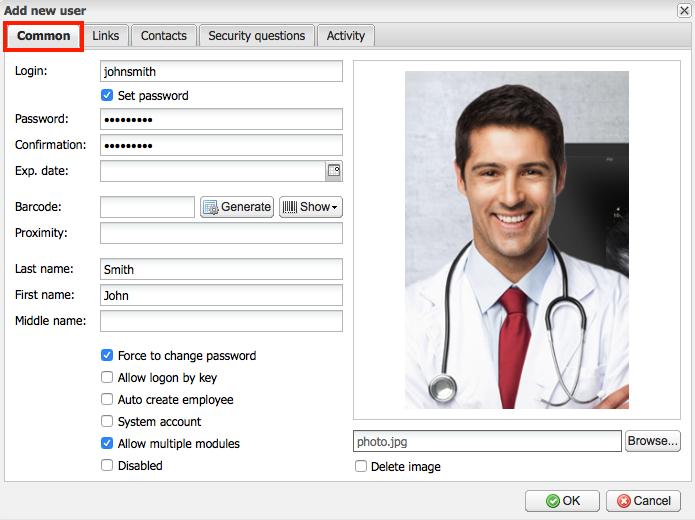
The Add new button is used to add a new user. It opens the Add new user window with specific user information to be added. The Common options in the window are: Login, Password, Expiration date, Barcode, Proximity, as well as the Last, First and Middle name of the user.
Login and Password are required to be filled in. Create a login for the user, set a password and confirm it. In the Expiration date field you can select the date when the user loses access to the account. In this case the account will remain but the user’s access to it will be blocked.
Users can also access their accounts with barcodes and proximity keys. Generate a Barcode by clicking the Generate button or enter a proximity key in the Proximity field. These features allow the users to logon by scanning their security keys with a code reading device. Both of the codes are required to be unique. You can view the generated barcode by clicking the Show button.
You can force the user to change the password. This is useful when you create a new user account and want the user to change their password when they log in for the first time.
Selecting the Allow logon by key checkbox allows the user to log in to the site via the Dashboard of the master EMSOW domain. The Auto create employee checkbox allows you to create an employee record for the user automatically (for more information please refer to the EMPLOYEES module). The System account option is not typically used for a regular user.
You can opt to disable the ability to open multiple tabs of the same module by deselecting Allow multiple modules. If the user opens the same module for the second time, the system will jump to the already opened tab. This option can be useful for reading doctors who do not wish to have multiple tabs of the same report draft open.
By selecting the Disabled checkbox you can disable the user account thus disallowing the user to logon.
There is also an option to upload or update the user photo.
Next, you can link the user account to a particular group, branch etc. so that the user is limited to see particular information. User accounts can have security links to groups and branches; links to technologists, employees, billing companies, referring or reading doctors or facilities; as well as to client domains.
For example, in order to provide access to EMSOW for a reading doctor, you should create a user account and link it to the reading doctor’s record. For more information please refer to the TECHNOLOGISTS, REFERRING DOCTORS, READING DOCTORS and GROUPS modules.
Add the user’s contacts such as Phone, Fax, E‑mail, Jabber, Address and Location, by going to the Contacts tab.
You can select a security question as an extra security layer using the Security questions tab.
The Activity tab shows the user recent activity as a list of sessions, but it is not relevant for a new user, so initially this field is blank.
After saving the user account, it appears in the table with the corresponding properties such as the user’s given name, their contacts, and their links to groups.
The Edit selected button opens the user editing window where you can make changes to the user account. Select the required user, click the button, and modify the Common info, the Links, the Contacts, and the Security questions. You can also view the user’s recent activity as a list of sessions in the Activity tab. Click OK to save the changes or Cancel to quit without saving.
 – For editing, there is as well another button in the rightmost column Actions. You can
click it to edit the required user account without selecting it in the table.
 – For removing users, there is as well another button in the rightmost column Actions. You
can click it to remove the required user account without selecting it in the table.


