1. Double-click the required service in Billing or Processing to open the billing information window. Click Edit for the study you need to bill for:

2. Click Add under Billing operations and fill out the following fields:
- Company – select the billing company you are going to bill through (see SETUP → BILLING → BILLING COMPANIES).
- Bill by – this field is only required if the provider that must be on the claim is different from the reading provider;
- Comp. is the component you are billing for. You can select 26 (professional component), TC (technical component) or leave it blank for GLOBAL. If you are billing for multiple components, create a billing operation for each of them.
- Tags are billing tags that you would like to add to this operation (see SETUP → BILLING → TAGS).
- Fee $ and Fee man. – these fields specify the fee you will be paying to the billing company for this operation. If you want to manually assign it, select yes under Fee man. and enter the fee amount under Fee $. Alternatively, you can set the fee in the billing company options (see SETUP → BILLING → BILLING COMPANIES) and select no under Fee man.; then the fee amount will be assigned automatically.

3. Then click Add under Billing procedures, select the billing operation that you added earlier, fill out the procedure and the number of units for this procedure, add modifiers to the procedure if required, and put diagnosis codes in the correct order for this study (note the Dx pointers column). When finished, click OK.

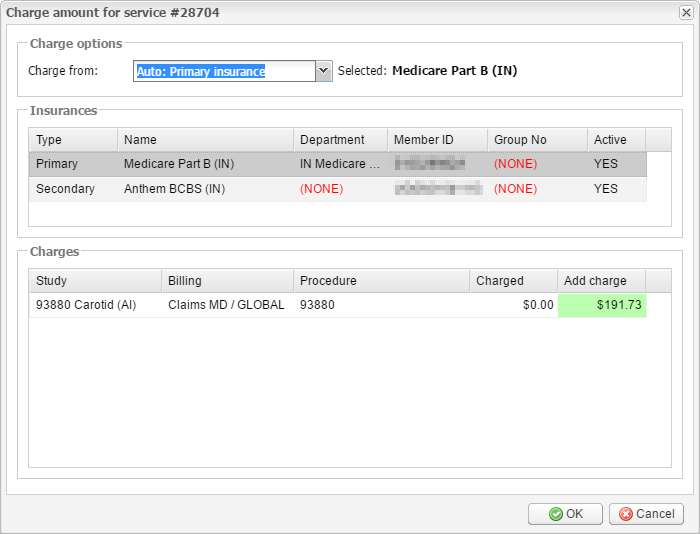
4. Now, in the billing information window for the service, add a charge to the study record by clicking Operations → Charge amount (the study should be selected under Billing operations in the bottom-left corner of the window).

5. A new window will appear. Select the payer you want to add the charge for and check the amount you are charging. Edit it if required. Click OK.

6. The system will automatically add a “rebill” transaction for the payer as well as an electronic claim.

Repeat steps 1 to 6 for every study you need to bill for.
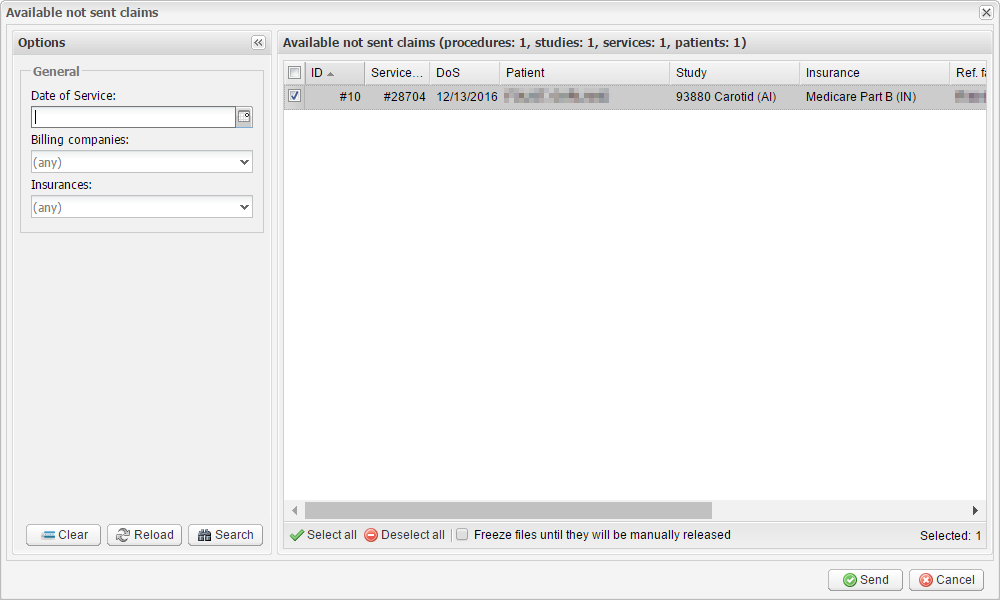
7. To submit claims, go to BILLING → CLEARING and click the Submit button.

8. In the Available not sent claims window, select the claims you want to submit, and send them by clicking the Send button. The system will take some time to process the claims, after which you will see a new request (REQ) file.

If you use the Claim.MD clearing house, a few additional things need to be mentioned:
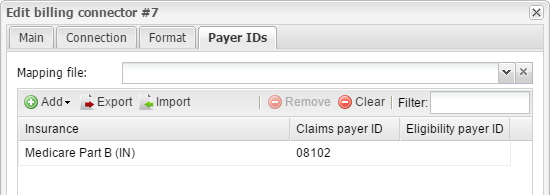
1. For every insurance you bill through Claim.MD, you need to add a claims payer ID to the billing connector. Here is how to do this:
1.1 Go to SETUP → BILLING → BILLING CONNECTORS. Double-click the Claim.MD connector. In the billing connector settings, switch to the Payer IDs tab. Click Add → Manual.

1.2 Select the insurance you would like to add a claims payer ID to, and enter their ID in the Claims payer ID field. The payer ID list is available from https://www.claim.md/payer/. When finished, click OK.
2. After you submit a claim, you may want to reach our support team and ask them to see the .result file to make sure that the claim has been received by Claim.MD. Here is how to do this:
2.1 In the Clearing module, add the Other type under General and run a search. The result file must follow the REQ file.

If you have any questions, feel free to contact the support team over email or over the phone.