The Insurance module is designed for managing patient insurances.
Follow the path SETUP → INSURANCES → INSURANCES to open the insurances managing tab:
Here you can see the list of insurances arranged in several columns: ID, Short name, Full name, Aliases, Departments, Payer ID, Actions. The last column contains two buttons for editing and removing insurance.
Above the list of insurances you can see the toolbar:
Add new – use this button to add a new insurance. After you click this button, a pop-up window will open.
On the Insurance tab enter the short name and full name of the new insurance. Click the Disabled checkbox to make the insurance unavailable for use. The only required field is Short name.
On the Departments tab you can add and remove departments for the insurance:
Click the Add button to add a new department. As the result, a pop-up window will open:
Enter the name of the department into the Name field. To add contacts, click the Add button and select the type of the contact in the drop-down menu: Phone, Fax, E-mail, Jabber, Address, or Location. Then enter the contact information and click OK to save or Cancel to quit without saving.
To remove a contact, click the Remove button. To remove all contacts, click the Clear button. Click the Disabled checkbox to mark the department as disabled.
On the Authorization tab you can manage the referral and authorization settings for the insurance:
Click the Referral required checkbox if the patient has to get a referral (a written order from the primary care doctor for the patient to see a specialist or get certain medical services) before the patient can get medical care from anyone except their primary care doctor.
Click the Authorization required checkbox if the insurance company needs to check before it will agree to cover certain prescribed medications or medical procedures.
If you want to specify the studies that require authorization, click the Authorization required only for studies checkbox and select the necessary studies below by using the arrow buttons.
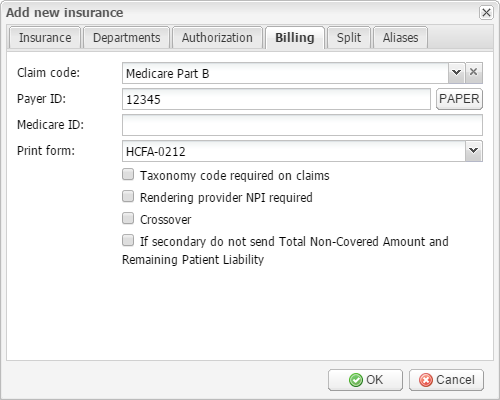
On the next tab you can set up the billing settings:
Here you can select the Claim code, enter the Payer ID (click the PAPER button for paper claims), enter Medicare ID, and select the type of printed form. If taxonomy codes or the rendering provider NPI are required on claims, click the corresponding checkboxes. Click the Crossover checkbox for crossover claims. If the insurance is supposed to be secondary and you don’t need to send total non-covered amount and remaining patient liability, click the last checkbox.
On the Split tab you can set up the splitting parameters:
Click the Allow split by components if you want to allow splitting by components for all studies. If you want to specify the studies for which the splitting is allowed, click the Split by components allowed only for studies checkbox, and select the necessary studies below by using the arrow buttons.
On the last tab you can add aliases to the insurance:
Click the Add button to add a new alias. To delete the selected alias, click the Remove button. To delete all aliases, click the Clear button.
Click OK to finish adding the new insurance or Cancel to quit without saving.
To edit the existing insurance select it and then click the Edit button on the aforementioned toolbar. As the result, the Edit insurance window will open. This window is identical to the Add new insurance window described above.
Insurance override rules
Follow the path SETUP → INSURANCES → INSURANCE OVERRIDES to open the insurance override tab:
Here you can see the list of override rules and the toolbar above it.
Click the Add new button on the toolbar to add a new override rule. As the result, a new pop-up window will open:
Type the position number into the Position field (it determines the rule’s priority). Check the Disabled checkbox to make the override rule unavailable for use. In the Note field you can enter an annotation.
Type the referring facility ZIP codes into the Zip code rule field. These ZIP codes are the condition of the insurance override rule: if one of the ZIP codes coincides with the referring facility’s ZIP code, the rule will apply.
In the bottom Override insurance section, select the insurance to be overridden in the From field and the insurance that will override it in the To field.
Click OK to finish adding the new insurance override rule or Cancel to quit without saving.
Click the Edit selected button to edit the selected override rule. After you click this button, the Edit insurance rule window will open. This window is identical to the Add new insurance rule window described above. You can also double-click the selected rule or click the edit icon in the Actions column to edit it.
Insurance eligibility check setup
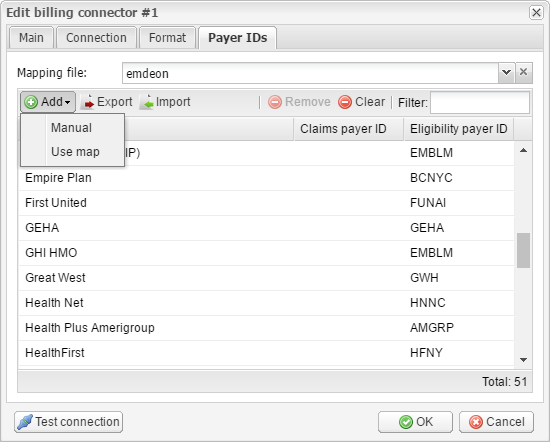
Follow the path SETUP → BILLING → BILLING CONNECTORS to open the Billing connectors tab. Then select the eligibility billing connector (most of the time it is called “Emdeon eligibility”) and click the Edit selected button on the toolbar. You can also double-click the billing connector with the left mouse button or click the Edit button in the Actions column. As the result, the Edit billing connector window appears. Select the Payer IDs tab. Select mapping file “emdeon”, then click Add and Use map.
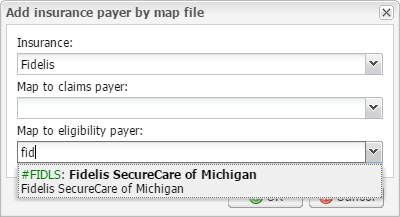
In the new window, select the insurance you would like to add the Payer ID to. And then in the Map to eligibility payer field, search for it again. Select what you have found and click OK.


