The Schedule setup module provides ways to manage schedule rules, office schedule colors, and time block reasons.
Schedule Rules
The Schedule Rules module allows you to create rules for event scheduling. After adding a rule, you can see the appropriate event on the Office schedule tab in the Schedule module. The event is scheduled according to the recurrence pattern and range of recurrence that you define. To open the Schedule Rules tab, follow the path SETUP → SCHEDULE → SCHEDULE RULES.
NOTE: You can only schedule recurring events using the schedule rules. To create a single event, please use the Schedule module.
On the top toolbar such buttons as Add new, Edit selected, Remove selected, Copy to clipboard and Export are available:
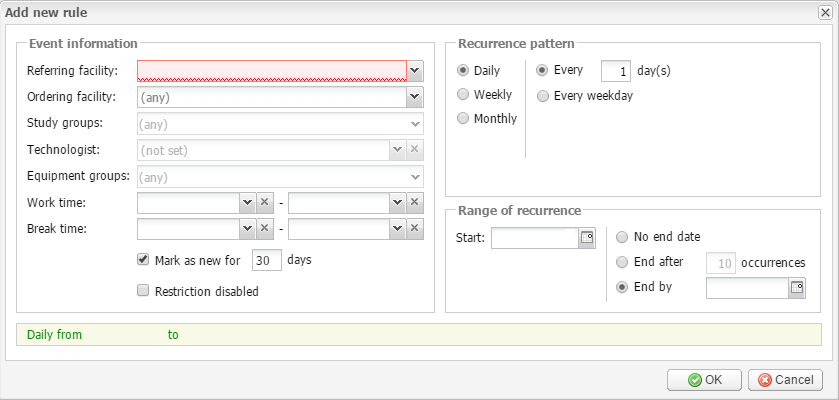
Add new – click this button to add a new schedule rule. After you click this button, the Add new rule window appears:
It consists of three sections: Event information, Recurrence pattern, and Range of recurrence.
In the Event information section, you can select the Referring facility to be visited and the technologist to perform scans, as well as the Ordering facility. In the Study groups field, select what groups of studies the technologist will be able to perform. You can also select Equipment groups if you use the Inventory module to track the use of equipment. Select Work time and Break time to specify the work and break hours of the technologist. The Referring facility field is the only field that is mandatory to be filled out, and the other fields can be blank. You can also select the Mark as new checkbox and set the number of days the rule will display as new. The Restriction disabled checkbox allows you to disable all restrictions regarding the connection between the following fields: the referring facility, study groups, technologist and equipment groups.
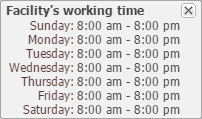
After you select a referring facility, a window with the facility’s working time appears for your convenience.
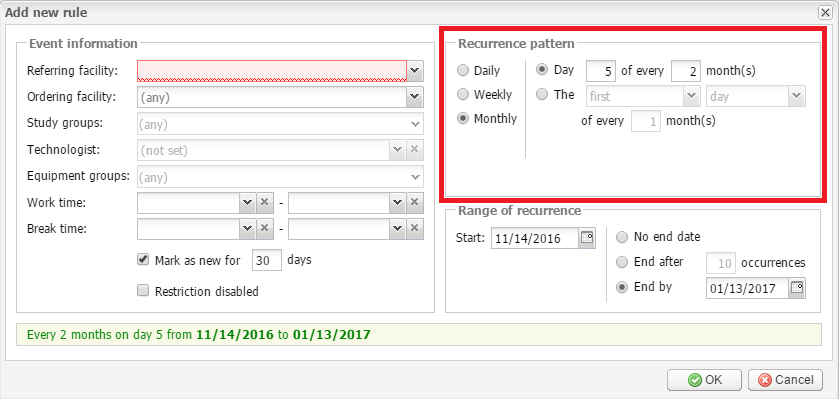
In the Recurrence pattern section, you can specify how often you want the event to occur. The available recurrence patterns are Daily, Weekly, and Monthly. When you select Daily, you need to choose either Every [1] day(s) or Every Weekday. Use Daily with the Every [1] day(s) option when you want the event to occur every day. Alternatively, you can set an interval (for example, the interval of 2 with the daily pattern means every other day). Use Weekly when you want the event to occur every week, or you can also set an interval (for example, the interval of 2 with the weekly pattern means every other week) and then select days of the week the event should occur on. Use Monthly when you want the event to occur every month. You can also set an interval – for example, the interval of 2 with the monthly pattern means every other month – and select a particular day. You can also select the first (second, third, fourth, second to last or last) day (weekday, weekend day or one of the days of the week) of every month (every other month, every third month etc.) in the fields below.
In the Range of recurrence section, you can set the period of time during which the event should occur. By default, the start date is the current date and the period of time is 2 months (see the End by option). Use the calendar to change these parameters. You can also select No end date or End after 10 occurrences (10 – by default). The Recurrence pattern and Range of recurrence sections are interrelated, so be careful specifying them.
At the bottom of the window you can see the frequency and the period of time (highlighted in green) for the event to occur according to the settings you have just created.
Click OK to save the changes or Cancel to quit without saving.
The Schedule Rules module displays a list of schedule rules arranged in several columns: ID, Disabled, Facility name, Technologist, Time, Recurrence pattern, Range of recurrence, Equipment groups, Study groups, Mark as new, Restrictions, and Actions.
Edit selected – this button opens a schedule rule edit window, which is identical to the Add new rule window described above. You can also double-click the rules to edit them.
 For editing, there is as well another button in the rightmost column Actions. It allows you
to edit the required rule without selecting it in the table.
 For removing rules, there is as well another button in the rightmost column Actions. It
allows you to remove the required rule without selecting it in the table. Click this button and then click
OK.
Added rules will appear on the Office schedule tab in the SCHEDULE module on the appropriate days according to the settings you have created.
Office Schedule Colors
This module allows you to manage colors in which events are highlighted on the office schedule. Follow the path SETUP → SCHEDULE → OFFICE SCHEDULE COLORS to open the module.
On the top toolbar such buttons as Add new, Edit selected, Remove selected, Copy to clipboard and Export are available:
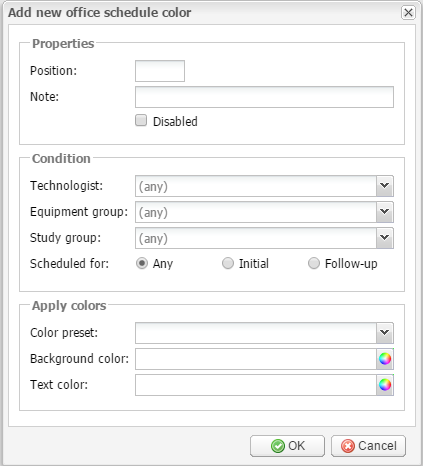
Add new – click this button to add a new office schedule color. After you click this button, the Add new office schedule color window appears:
It consists of three sections: Properties, Condition, and Apply colors.
In the Properties section in the Position field, enter the position of the office schedule color. The position determines the priority of the color. The lower the number, the higher the priority. In the Note field you can type an annotation for the color. Select the Disabled checkbox not to use the office schedule color rule.
In the Condition section, you can select conditions that will trigger the use of this color for events on the schedule. The available conditions are technologists, equipment groups, and study groups. In the Scheduled for field, select Any, Initial, or Follow-up to use the office schedule color for particular appointment types.
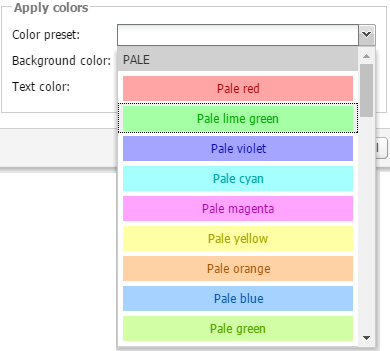
In the Apply colors section, select the color that should be applied to the events when the specified conditions are met. The Color preset field allows you to select the desired color from an advanced list of presets (pale, soft, very light, very pale, very soft colors):
When you select a preset in the Color preset field, the background and text colors are set automatically according to the selected tone.
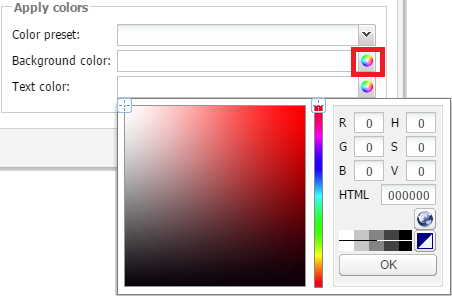
You can change the colors using the small color wheel buttons to the right of the Background color and Text color fields. Click the button and pick the required tone from the palette.
Click OK to save the office schedule color or Cancel to quit without saving.
After saving a new office schedule color, it appears in the table with the corresponding information:
Events that satisfy the listed conditions will be highlighted in the appropriate color in the Schedule module.
Edit selected – this button opens the office schedule color edit window, which is identical to the Add new schedule color window described above. After editing the required color, click OK to save the changes or Cancel to quit without saving.
 For editing, there is as well another button in the rightmost column Actions. It allows you
to edit the required color without selecting it in the table.
 For removing office schedule colors, there is as well another button in the rightmost column
Actions. It allows you to remove the required color without selecting it in the table. Click
this button and then click OK.
Time Block Reasons
This module allows users to create time block reasons to make particular times available or unavailable for scheduling on the Patient schedule tab in the Schedule module. Follow the path SETUP → SCHEDULE → TIME BLOCK REASONS to open the module.
On the top toolbar such buttons as Add new, Edit selected, Remove selected, Copy to clipboard and Export are available:
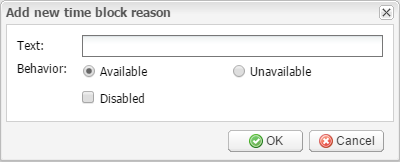
Add new – click this button to add a new time block reason. After you click this button, the Add new time block reason window appears:
Type a reason in the Text field, and select a Behavior type (available or unavailable) to set if this time block will be available or unavailable for scheduling. Select the Disabled checkbox to make the time block reason unavailable for use. Click OK to save the time block reason or Cancel to quit without saving.
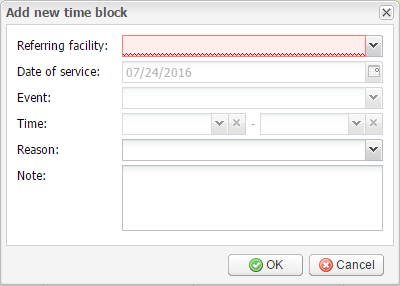
You can also add, edit or remove time block reasons on the Patient schedule tab in the Schedule module. To do so, select Add, Edit or Remove in the Time block drop-down menu.
To add a new time block in the Schedule module, specify the following fields: Referring facility, Date of service, Event, Time, Reason and Note. The Referring facility field is the only field that is mandatory to be filled out, and the other fields can be blank. Click OK to save the changes or Cancel to quit without saving.
After saving the reason in the Time Block Reasons module, it appears in the table with the corresponding information:
The Edit selected button opens the edit window, which is identical to the Add new time block reason window described above. After editing a time block reason, click OK to save the changes or Cancel to quit without saving.
 For editing, there is as well another button in the rightmost column Actions. It allows you
to edit the required reason without selecting it in the table.
 For removing time block reasons, there is as well another button in the rightmost column
Actions. It allows you to remove a reason without selecting it in the table.

